This document provides all the details needed to download and install a local instance of the PII Vault. The only items you will need in addition to these instructions are the specific activation keys which will enable your PII Vault to operate.
The PII Vault is provided as a Docker Container. It is strongly advised the person implementing the PII Vault be sufficiently experienced with Docker.
Step 1: Download the PII Vault
The Docker image can be downloaded directly from Docker at https://hub.docker.com/r/anonomatic/piivaultwebapi Which version you download will depend on the license you have purchased. Note the name of the image you downloaded. It will be used in the next step as <Vault Download Name>.
Step 2: Activate PII Vault
Once downloaded you will need this command to start it from Windows PowerShell or equivalent: docker run –name < Vault Download Name> -p 0.0.0.0:9443:443 -p 0.0.0.0:9480:80 -e “PIIVAULT_SECRETS_KEY=” -e “ASPNETCORE_URLS=https://+:443;http://+:80” –detach anonomatic/<Vault Download Name>
Notes:
1. Vault Download Name is the name of the image download from Docker.
2. Secret Key will be provided via email as part of the registration/purchase process.
Step 3: Use the PII Vault
1. The URL of the PII Vault is https://<Docker Host Name>:9443
2. Account Id and API key will be provided via email as part of the registration/purchase process.
3. Open the URL + “/index.html” in a browser to access a Swagger page which details all the available endpoints.
Step 4: Secure your PII Vault with Security Certificate
We are using a self-signed certificate. If you want to replace it with your own, or get the certificate to install on your host machine, you can reference these two files in the docker image PIIVault.Web.Cert.pfx and appsettings.kestrel.json. The appsettings.kestrel.json holds the location and password for the pfx file.
Step 5: Create PII Vault Subscription Account
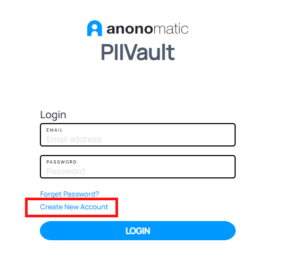
To use PII Vault you will require the appropriate credentials. To create those credentials, you will need to register. Access to the registration form is available via https://<Docker Host Name>:9443/ui and select Create New Account.
Which will take you to the form where contact information is specified.
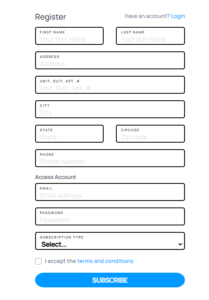
Once the contact details have been entered, select either Standard Subscription or Free Trial. To activate a Standard Subscription, you will require an activation key. This will be provided to you from either the automated signup process or from your sales rep.
Additional Notes:
-
- The PII Vault will automatically re-route HTTP to HTTPS. If you prefer for this not to happen, edit appsettings.json in the container and add the key below. With this key, HTTP will not be forwarded to HTTPS.
“ApiConfiguration:NoHttpsRedirection”: “1” - User the PII Vault UI to:
a. Create and manage Subscriptions
b. Create and manage Accounts - To access the PII Vault UI open https://<Docker Host Name>:9433 in a browser.
- To use a different port, other that 9443, change the Docker Run command replacing the port number 9443 to whichever port you prefer to use. For example, XXXX in the snippet below would be the port number you are going to use: “… -p 0.0.0.0:9443:443” would be changed to “-p 0.0.0.0:XXXX:443 …”
- The PII Vault will automatically re-route HTTP to HTTPS. If you prefer for this not to happen, edit appsettings.json in the container and add the key below. With this key, HTTP will not be forwarded to HTTPS.